Prep Time30 minutes
Cook Time30 minutes
Chill time1hour hr 15 minutes
Total Time2hours hrs 15 minutes
Servings 8 servings
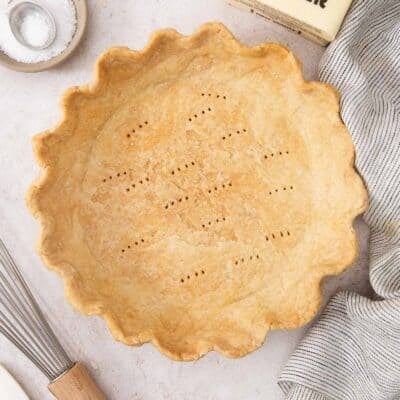
I’ve tested this one dozens of times over the years to get it just right—flaky, flavorful, and consistently golden. With a few key tricks, like grated frozen butter/shortening and an egg-vinegar blend passed down from my Grandma, this crust bakes up beautifully every time!
Equipment
- metal pie plate better for GF pies
- silicone baking mat for rolling out the crust
- Pie weights I use 2 containers
- Pizza Steel for a crispy bottom crust!
Ingredients
- ▢½ cup (113g) butter frozen until solid
- ▢2 tablespoons (28g) shortening frozen until solid
- ▢1½ cups (225g) gluten-free measure-for-measure flour
- ▢1 teaspoon granulated sugar
- ▢½ teaspoon kosher salt
- ▢1 large egg
- 1 tablespoon white vinegar
Instructions
- Be sure to freeze your butter and shortening in advance!
- In a medium bowl, whisk together the gluten-free flour, sugar and salt.
- In a small measuring cup, add the egg and vinegar. Whisk until completely smooth, then add cold water until the mixture measures ½ cup and whisk to fully combine. Refrigerate the egg-vinegar mixture until ready to use.
- Using the large holes of a box grater, grate the butter. Add the grated butter to the dry ingredients and toss to coat in the flour mixture.
- Using the large holes of a box grater, grate the shortening. Add the grated shortening to the dry ingredients and toss to coat in the flour mixture.
- Drizzle 1 tablespoon of the egg-vinegar-water mixture over the flour and butter mixture. Using a rubber spatula, gently stir and toss the mixture, distributing the moisture evenly. Continue adding the liquid, 1 tablespoon at a time, stirring after each addition, until the dough begins to come together in large clumps. Repeat until you’ve added 5-6 tablespoons of the liquid. (Note that you will only use about ½ of the liquid.)
- Pour the dough into a bowl and use your hands to gently bring the dough together, being careful not to overwork it. Add another tablespoon of liquid if needed. Don’t be tempted to add too much liquid! It should be moist enough to hold together when pressed but not sticky.
- Turn the dough out onto a lightly floured surface. Gather it together with your hands, pressing any loose bits into the dough to form a cohesive ball.
- Gently shape it into a disc about 1 inch thick. Wrap the disc tightly in plastic wrap and refrigerate for 1 hour or up to 2 days.
To roll out:
- If the dough has been in the refrigerator longer than 1 hour, let the dough sit at room temperature for 15 minutes before rolling.
- Place the dough on a lightly floured pastry mat or a silicone baking mat. Roll the pie crust into a circle 12 inches in diameter. You may need to press it together if it starts to slit or break on the edges. This is normal; gluten-free pie crust requires a bit of patience to roll out.
- After rolling, use the pastry mat to flip the dough into a 9-inch pie plate. Gently ease the dough into the edges of the pan. Trim any excess edges with scissors and shape the edges as desired.
Wrap the shaped pie crust loosely in plastic and place in the freezer for 15 minutes or up to 1 hour until chilled and firm. With a fork, prick holes all over the bottom and sides of the crust. If you’re preparing a pie that calls for unbaked dough, stop here and continue with your pie recipe.
To blind bake:
- Place a pizza steel in the oven. (A pizza steel helps to ensure a crispy bottom crust.) Preheat the oven to 375°F.
- Line the frozen crust with parchment paper and pie weights. Bake until the edges of the crust are starting to brown and appear set, about 16-18 minutes.
- Remove the crust from the oven and carefully lift the parchment paper and weights out of the pie. Return the pie crust to the oven.
For a partially baked pie crust:
- For pies that will be baked again after filling, such as quiche, bake until the bottom crust just starts to brown, about 8-10 minutes longer.
For a fully baked pie crust:
- Bake until the bottom crust is golden brown, about 12-14 minutes longer.
- For no-bake pies, let the crust cool completely before adding the filling. For pies that require further baking, you can add the filling while the crust is still warm (unless directed otherwise by your recipe).
Notes
Gluten-Free: I recommend King Arthur Gluten-Free Measure-for-Measure Flour for this crust! This recipe turns out best when the flour is measured by weight.
Dairy-Free: This gluten-free pie crust cannot be made dairy-free. It was designed specifically to be made with butter and dairy-free alternatives won’t produce the same results.
Freeze butter/shortening: Don’t skip this step! Freeze both the butter and shortening in advance. The cold fats are key to getting a flaky, crisp crust.
Be careful with the liquid: It’s very important to not add too much liquid to the dough. Gluten-free flour takes longer to hydrate and will continue to absorb the liquid as it chills in the fridge.
Pie pan/weights: I like to use this 9″ pie pan and these pie weights!
To Make-Ahead: This crust can be prepared up to the step where its shaped into a disc and wrapped tightly in plastic wrap, then refrigerated for 2 days.
To Store: Baked pie crust can be stored at room temperature for 1 day or in the fridge for up to 3 days. Let it cool completely, then wrap it tightly (but gently!) in plastic wrap.To Freeze: I don’t recommend freezing the crust once it’s baked as it tends to soften and lose its crispness.
Nutrition
Calories: 215kcal | Carbohydrates: 17g | Protein: 3g | Fat: 16g | Saturated Fat: 8g | Polyunsaturated Fat: 2g | Monounsaturated Fat: 5g | Trans Fat: 1g | Cholesterol: 51mg | Sodium: 245mg | Potassium: 11mg | Fiber: 2g | Sugar: 1g | Vitamin A: 384IU | Calcium: 22mg | Iron: 1mg
